Nimbus Tip: Currently, Nimbus CLI is only available for macOS via Homebrew
OverviewInstallation & Set up on macOSUI & Commands in CLIMenu BarStart your workspaceCLI CommandsSSH Command DetailsSync Command Details
Overview
VSCode and its UI are great for coding and interacting with your dev environments. However, it’s not the best place to manage dev servers, permissions, or other account/user administration. This is where Nimbus CLI comes in. With our CLI, we can unleash Nimbus’ potential and add value to your workflow.
In this tutorial, we will show you how you can install Nimbus CLI and get you ready for its various benefit.
Installation & Set up on macOS
- Open your terminal and ensure you do not have the Nimbus CLI already installed. Run
nimbus versionas a quick way to see if the CLI is already installed
- If the CLI is not installed, run the following commands to Install Nimbus CLI
brew tap usenimbus/nimbusbrew install nimbus
- Once installed, you’ll need to log in before using any CLI functionality. Nimbus will authenticate you through your browser. Run the command below and expect to see the result below.
- Command to run:
nimbus account login - Expected result:
✅ Successfully authenticated with Nimbus, you can now close this tab
If you are running a self-hosted instance, run
nimbus account login --instance-url https://nimbus.company.tldUI & Commands in CLI
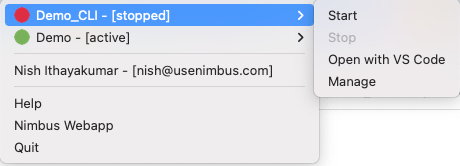
Menu Bar
Once the CLI is installed and you’re logged in, take a look at your menu bar. You will see a Nimbus menu item. From the menu bar, you can easily launch and manage workspaces.
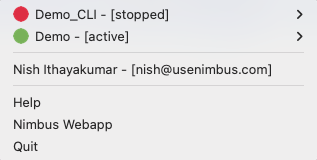
Start your workspace
To start your workspace, use the Nimbus menu bar. You will be able to start, stop, manage, or open the workspace with VS Code. To launch with a JetBrains IDE, head to the Nimbus Webapp or do so directly from JetBrains Gateway.
CLI Commands
The following commands are available.
account: Manage your Nimbus account(s)
help: Help about any commandssh: SSH into a workspacesync: Sync a local project with your Nimbus workspacetemplate: Manage Nimbus Template(s)version: Show nimbus-cli versionwhoami: Get your account detailsworkspace: Manage Nimbus workspacestray: Menubar application [Mac OS only]SSH Command Details
- This command will present a list of your workspaces.
- Select an “Active” workspace to instantly connect via SSH to your remote workspace.
- You cannot SSH into an “Inactive” workspace.
Sync Command Details
- This command lets users sync files to and from their remote Nimbus workspace and a local directory.
- To create a sync, you will use the
createcommand. You will also need to include a unique name (”—name”), the local directory path (—local-path), and the remote directory path (—remote-path) - E.g
sync create --name nish-sync --local-path ~/Desktop/local/folder_to_sync --remote-path /home/nimbus-user/remote_folder_to_sync - After entering the command, you will be asked to select the remote workspace that you want to sync
- The sync can be managed via the Nimbus menu bar or terminal. Available functions include:
list: List all active syncspause: This will pause a syncresume: This will resume a paused syncstatus: This will confirm the status of a sync (e.g. paused or active)terminate: This will terminate a sync